Posts

Showing posts from 2016

Battery holders and ST-Link

Image
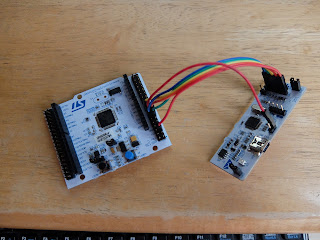
I'm printing a new version of my round robot chassis with PETG. I had one initial objective: to add better battery enclosures, because the batteries on the first one just fell out. So I added some integral ones. I looked around Thingiverse and found these , which led back to these . I actually designed my own: since I needed to resize to CR123, and didn't find the SCAD files all that readable: full of magic numbers... I used the clips from the second design, because they were better specified, and not expensive from rs-components. Anyway, I printed that version in PETG. When I came to get it off the plate, the base layer just stayed on the plate: the adhesion between the plate and the base was greater than the adhesion between the shell and the filling! I've refactored the chassis quite a lot to deal with that. The latest iteration is printing now. The other change was to support a Nucleo 64 board like the STM32F303RE one. I've managed to remove the programmer,

IP Camera

I found this Raspberry Pi Zero camera enclosure on Thingiverse. I printed it first using Cura to slice it. That didn't work so well: every 5mm or so, the model had weak layers. I decided it was time to try slic3r instead. Slic3r is much better supported by Prusa Research: you can get a config bundle from the Mac distribution , and I've just installed the Ubuntu version:   $ sudo apt-get install slic3r I was expecting a lower level experience to Cura, but basically it's the same interface: a view of the build plate with the objects on it, and some tabs to configure the options. I definitely won't bother with Cura again. The model itself might benefit from a bit of smoothing around the slots before you put it together. Don't use a nyloc nut in the pivot if you printed with PLA at least: it won't be strong enough. I found out the hard way, but of course I could just print another one. I'm now installing MotionEye as per these instructions . MotionE

Cura for Ubuntu 16.04

I started writing a post about building Cura for Ubuntu from source. It turned into an Epic. I suppose I should have checked that it had sane python packaging before I started. It doesn't. The maintainers have resorted to one of those horrible check it and all it's dependencies and build then all scripts, that are always completely impenetrable when they don't work. Thankfully, someone with much more patience than me has done it already. It's here .

Building a Prusa i3 Mk2

Image
I'm quite a long way though the build. I spent about 2 hours on it on Tuesday night and another 2 hours last night. I have the extruder mounted on the X-Axis, so basically all the mechanical parts are done. I've messed up a few things: I couldn't get the rods fully into the X-Axis motor mount, until I resorted to using a hammer. Also, when I slid the X-Axis on, I wrecked one of the bearings. Fortunately I had a spare lying around. Here are some of the sub-assemblies: the Y-Axis: The troublesome, too long X-Axis: I think I have the hang of the instructions now. It's pretty easy to not get everything oriented correctly: for example, the cable management depends on the correct orientation of the motors and fans. I still managed to put the extruder fan in the wrong way the first time. It's an annoying mistake, because where the screws are tapped into plastic parts they are very stiff! I have to say, I feel the whole thing is a bit flimsy, and I'l

3D Printers

After printing a few more parts, and being a bit frustrated at the latency, I've decided I probably could get some value out of a 3D printer. I don't want to have to fiddle around too much with the build, so I've decided I want auto levelling, or a levelling sensor. I also want a heated bed, and a high temperature hot end so I can experiment with different materials. I decided to weigh one of my parts, and found it was about 30 grams. At £16 a kg, that's about 50p worth of PLA, so I guess a 1Kg spool would go a long way. It cost me £6 to get the part printed. Possible contenders: Ooznest Prusa i3 kit  £399 Prusa i3 Mk2 kit  £629 Orballo Prusa i3 Steel £368 The Orballo has a few negative reviews, which they claim to have addressed. They also seem to attract complaints for slow shipping. It doesn't have auto levelling. On the positive side: they have an option for no-maintenance bearings which is appealing. The steal frame is well regarded. If you choose

Temperature and humidity

Image
Recently the down pipes in my block of flats got blocked. The roof is flat, and a foot of water collected on it before it started to come in. Not just a bit: the flat upstairs flooded, with 2 inches of water on the floor. Our flat was the least worst affected. Anyway, I now want to monitory the humidity in each room in the house. A colleague of mine had written this , basically to settle an office dispute about air conditioning :). It's been through various iterations but it's using an ESP8266. Since someone else has done the hard work, I figure I'll use it. I've simplified it for home use , which is to say I just send data to Graphite over UDP, rather than MQTT. Even this modest change caused some pain: you have to copy the host name into memory before you can pass it to the UDP library? Anyway, I figured that out by reading the MQTT library. I also used a different sensor - an AM2321 which seems to be regarded as generally superior to the DHT22. I didn't ha

Rotary encoders

I have some micro metal gear motors I've soldered Pololu 3.3V optical rotary encoders onto micro metal gear motors. These have a direct analog output. I thought from a quick read of the instructions they might be tuned to work on digital inputs. If you read all the way to the bottom it suggests using comparators. That's going to be a pain, because what you compare to is going to have to be adjustable. I can't get anywhere near the output voltage Pololu claim, and the two signals have quite different voltages on the one I've experimented with so far. A rotary encoder generates two signals. Going forward, one signal will be 90 degrees forward of the other, and going in reverse, the opposite. The rising edge of one signal can be used to trigger a capture of the other signal which can be used to determine the direction. The capture needs to happen within 1/8th of the period of the encoder signal to be reliable. The motor could run up to 30K RPM, The encoders have 3

Cheap digital caliper DRO

Image
I can't remember how I stumbled on this idea. I think I noticed the connector on a set I had, and thought I'd Google it. I was thinking this would make building a CNC mill easier: no need to worry about backlash in the hardware: just measure where you are. Anyway, a long time later, I asked myself the question: how can I use the mill to accurately cut a square hole. My X-Y table doesn't have stops, and it has terrible backlash. I found a youtube video which used a DRO to do it, and was reminded. There are lots of articles on this. I've used this one at nerdkits.com as a starting point for the adapter. It provides an easy power supply circuit. I bought some sets of stainless steel callipers on ebay which turn out to be complete rubbish. I've just soldered some wires onto the terminals so I can play with them using a breadboard: On reassembly, they mostly work after some screw re-tightening, but are a bit jittery. I think I won't do that again: I'll

3D Printing

Image
I've been a little dismissive of 3D printing. Mostly, it seemed to me the result wasn't all that strong. Anyway,  3dhubs  came along, and that's persuaded me to give it a try: no big upfront investment, so why not? It's a great user experience - upload your STL file and it lists services with a price next to each one. I picked a place a few minutes walk from my office so I could go and pick it up. So I designed and printed this little robot chassis: After thinking about it for a while they gave me a voucher, so it cost me £3. Otherwise this costs about £12, which is not bad either. The top fits on it pretty neatly, after trimming off some excess filaments. I have made a few mistakes, which I think I can fix with the milling machine easily enough. I'll put that down as a learning experience. I don't have time to fit the components just now (actually a bunch of soldering needs to be done as well).

New frameworks and build tools

PlatformIO is very useful! I've just been trying it out. I've forked it and added a command that lets me update the IDE config without running init. This is handy since you want to re-run this each time you #include something from another library: PlatformIO works out the include path from the names of the things you include, like the Arduino IDE does. This has led me to notice that MBED is a nice framework. Because it's superficially Arduino like I'd never noticed that it has a convenient RTOS library, among many others. I think I'll port my RF24 library to MBED, and add it to the PlatformIO index. PlatformIO might be a good way to get some use out of the ESP8266 modules I have lying around as well.

Raspberry pi dome camera

This is rather good: http://www.sonsoftone.com/?page_id=287 I wanted to create something like this before I went away on holiday. It didn't occur to me you could buy dome housings like this. They are cheap! I already have the pan tilt unit.

Little bits of progress on NRF24

It's been so long since I posted about this I had to go back and look at what I'd last written. I've covered a lot of territory. Recently, the NRF24L01+ driver I'm using has proved problematic, as has the data sheet itself: It doesn't make it clear if FLUSH_TX or FLUSH_RX delete all the contents of a fifo, or just the next item. From this in the product specification, you might think just the next item: Note: Always check if the packet width reported is 32 bytes or shorter when using the R_RX_PL_WID command. If its width is longer than 32 bytes then the packet contains errors and must be discarded. Discard the packet by using the Flush_RX command. Otherwise it's a bit ridiculous: why would you discard valid packets from the receive buffer to get rid of one invalid packet at the head? Actually FLUSH_RX does flush everything. Why would you suggest that when you can discard a single packet by just aborting an R_RX_PAYLOAD?  There are perhaps a reason for

A bit more about nRF24L01, IP over nRF24L01

The RF24 has an 'Enhanced Shockburst' mode (honestly who thinks up these names). It's asymmetric:  one end is the PTX (primarily transmitting) and the other the PRX (primarily receiving). The PTX sends a packet and awaits an acknowledgement, and the PRX waits for packets and sends acknowledgements, however the acknowledgements have an optional payload. The result is a full duplex link, with an 'upstream' data rate limited by the downstream data rate. The RF24 does all this automatically: getting from and writing to it's transmit and receive buffers. A fully general serial driver could negotiate switches between modes automatically, but there's a reason not to bother to do this: PTX can only be to a single device, while PRX mode supports up to 6 remote devices - i.e. a hub would use PRX mode exclusively. I'm wondering what 'IP over RF24' would look like. 32 bytes is too small to be the MTU. Perhaps something like this would work: leaves woul